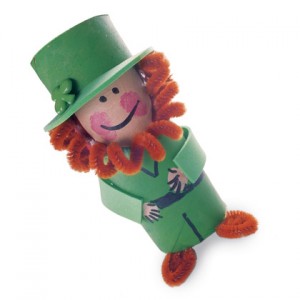
It’s supposed to be a beautiful week here in Southern California so I don’t think the kiddos and I will be spending too much time indoors. But if you’re still feeling the effects of winter and you’re looking for some fun indoor activities, check out Disney FamilyFun! They offer St. Patrick’s Day-themed crafts…here are a few that I spotted…
Wee Leprechaun
- Total Time Needed:
- 1 Hour
- Materials:
-
- Toilet paper tube
- Green craft foam
- Acrylic paints: green, skin-tone, pink, and brown
- Black permanent marker
- Tacky glue
- 4 brown pipe cleaners
- Decorative button
- Instructions:
-
- For this crafty little decoration, first trace around the end of a toilet paper tube onto a piece of green craft foam.
 Draw a 2 1/2-inch circle around the first circle, then cut them both out to create a hat top and brim and set them aside.
 Next, using acrylic paints, paint the paper tube green. Add a skin-tone face and hands, plus rosy cheeks, as well as a band of brown paint around the back for hair.
- Once the paint has dried, use a permanent marker to draw on facial and clothing details, then use tacky glue to stick on 3 coiled brown pipe cleaners: 2 in the back for hair and 1 around the face for a beard. For feet, fold another pipe cleaner in half, then tightly coil and pinch the ends, as shown.
- Place the folded pipe cleaner inside the tube and glue the feet to the edge. Glue on the hat top and brim and a 5 1/2- by 1/2-inch strip of craft foam for arms.
- Finally, glue a decorative button to the hat brim.

-
- Total Time Needed:
- 1 Hour
Luck o’ the Irish Shamrock Cap

- Materials:
-
- pencil
- ruler
- two 12- by 18-inch sheets of green craft foam
- heart-shaped cookie cutter
- scissors
- hot-glue gun
- masking tape
- clothespins
- 3 green pipe cleaners
- green ribbon
- Instructions:
-
 First, mark and cut one sheet of foam (as shown). (Use wider circles for a larger hat.) See cutting instructions for a whole sheet.
 Cut the second sheet of foam in half lengthwise and glue the 5- by 6-inch rectangle to the end of one half. Allow the glue to dry.
 Roll the strip into a cylinder that fits inside the ring of foam (the hat brim), then glue the overlapped edges in place, using the tape or clothespins to hold them until the glue has dried.
 Make ¾-inch vertical cuts (approximately 1½ inches apart) around the bottom of the cylinder, as shown, then fold the tabs outward. Fit the brim over the top of the cylinder, pulling it down to the bottom, and glue the tabs in place against the underside of the brim. Glue the 7-inch circle onto the top of the hat.
 For the shamrock, glue one end of each pipe cleaner to the middle of a foam heart. Allow them to dry, then twist the pipe cleaners into a stem.
- Make two small cuts in the front of the hat, one above the other, close to the brim. Poke the stem in through one hole and out the other, bending the end so it rests on the brim.
- Finally, tie the ribbon around the hat, and it’s ready to wear.
- I did not receive compensation for this post.
Latest posts by Caryn Bailey (see all)
- Discover Luxury at Sonesta Irvine: Your Ideal Staycation - August 8, 2024
- CHOC Walk Returns to the Disneyland Resort – Special Events and Ways to Support - June 28, 2023
- Beastly Ball Returns to the Los Angeles Zoo - May 8, 2023

I totally made the Wee Leprechaun a little over a week ago! He’s just too cute! He’s going to be hiding a pot of gold for the kiddos to find (using some clues) on St. Patrick’s Day. I’m really excited…can you tell? 😉
Great tutorial! I love the curly pipe cleaner hair the most!
These are both wonderful projects that I bet kids would love making and playing with or wearing.
I did it with my kid yesterday and we loved doing it. thank you!