{Sponsored}
During my son’s last week of camp, he brought home a pretty awesome-looking Minecraft-inspired pencil case made with Duck Tape. I breathed a sigh of relief because it meant one less back-to-school item to purchase. And because he chose the design and helped create it, I knew it was something he would use and take care of.
I can’t say that I was surprised when my daughter asked for her own pink and purple pencil case made with princesses and fairies, and a store-bought one wouldn’t suffice. I had attempted to make a Duck Fabric Owl Pouch while in Bentonville this Summer, but the short amount of time and my crafting skills left me a bit confused. Thankfully, I had some help from the reps at Duck Brand and a mini printable tutorial. If you’re looking for inventive ways to use Duck Tape, I encourage you to check out their “Ducktivities” section on their website. At present, there are over 100 Duck-inspired projects and crafts on the site organized by category.

Just in time for the new school year, Walmart has a generous section of all-things Duck Tape including vibrant, colorful, neon, character-inspired and printed rolls, Duck Fabric, and Duck Tape Sheets. And right now, in-stores you can purchase 3 rolls for just $9 which is a steal! We headed over to the craft section at my local store and my kids picked out their favorite characters and colors so we could sit down together and make Duck Tape Pencil Cases. My kids were thrilled to see their favorite characters on Duck Tape including Angry Birds, Despicable Me, Disney Frozen, Hello Kitty and so many more (I even spotted Bieber!).

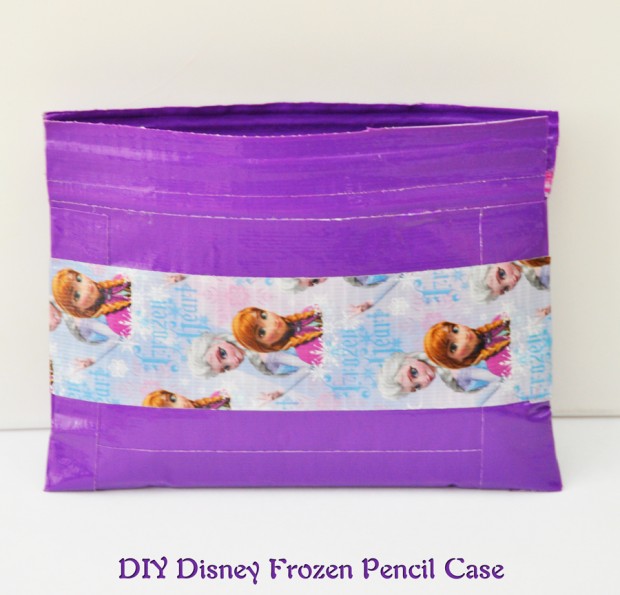
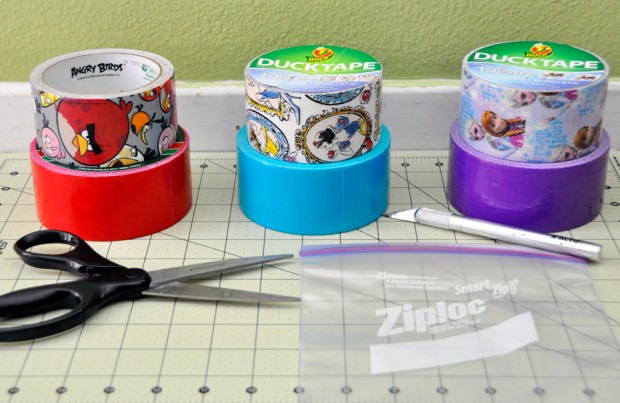
These pencil cases are actually easier to make than they initially appear. And with practice, you’ll be able to make one in less than 10 minutes. Here is what you’ll need for this DIY Disney Frozen Pencil Case:
1 roll of Duck Brand Duct Tape in Purple
1 roll of Disney Frozen Duck Brand Duct Tape
1 Zippered Ziploc Bag (Quart Size)
Pair of Scissors
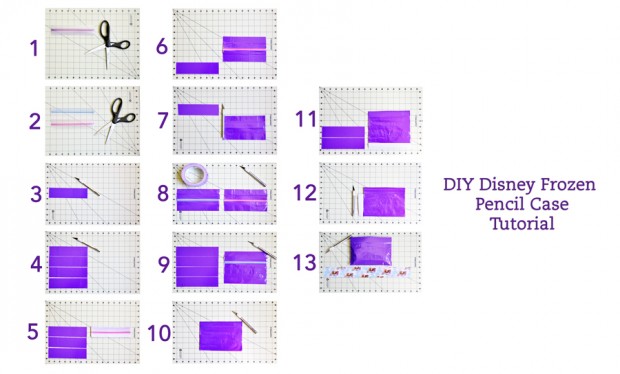
Disney Frozen Pencil Case Tutorial
- Cut off the zipper from the bag using the X-acto knife or scissors.
- Open the zipper and separate the 2 parts of the zipper using the X-acto knife or scissors.
- Using the cutting mat, measure out 5 8-inch strips of purple duct tape. Be sure to measure your plastic bag and add approximately 1/2 inch so that you have room to trim once you are ready to complete the pencil case.
- With the sticky side facing up, apply the pink zipper facing up on top of the duct tape
- Apply 1 piece of 8-inch purple duct tape sticky side down to both the top and bottom of the zipper to cover up the white adhesive (zipper should be the only part visible)
- Flip upside down and overlap 2 8-inch strips of purple duct tape to fill in the back of the tape so it isn’t visible
- Repeat steps 1-6 for the blue zipper
- To create your pencil case, continue to apply overlapping 8-inch strips of purple duct tape until you achieve your desired length. I used 4 additional strips of duct tape to create the length (remember you’ll need to apply to both the front and the back so that the adhesive is not visible)
- Cut off the excess duct tape above the zipper. You should leave a 1-inch margin above the zipper.
- Trim the sides and bottom of each side of the pencil case so they are even. You may need to trim the top part above the zipper to ensure they are even when closed.
- Close the zipper
- Cut 1 8-inch strip of purple duct tape and place half over the bottom of the pencil case. Flip over to fold the tape over which will then seal the case. Cut off any excess tape.
- Cut 2 pieces of duct tape to match the side of your pencil case, being sure to begin underneath the zipper to ensure you can still open the pencil case.
- Apply each strip to the side of the pencil case to seal.
- Open the zipper to ensure duct tape has not covered the zipper.
- Cut 1 16-inch strip of Disney Frozen Brand Duct Tape and apply over the center of the pencil case. Try to ensure the edges of the tape line up with the edge of the pencil case so this is not visible.
**You can opt to include an i.d. holder in place of the Disney Frozen decorative band by cutting out a 2.5″ by 4″ piece of from the plastic bag and attaching it using pieces of duct tape.

There are several ways to make this pencil case, and if you are struggling, I recommend checking out Duck Brand’s tutorial or watching a YouTube Video.
This was a fun project and it got easier the second time around. My kids love personalizing their “things” and this project allowed them to pick out their favorite colors and characters and use a bit of creativity.
For additional DIY School Supply Ideas check out these projects from my fellow Walmart Moms:
Washi Tape Personalize School Supplies
Back to School Card Making Party
- Discover Luxury at Sonesta Irvine: Your Ideal Staycation - August 8, 2024
- CHOC Walk Returns to the Disneyland Resort – Special Events and Ways to Support - June 28, 2023
- Beastly Ball Returns to the Los Angeles Zoo - May 8, 2023


Oh my gosh! SO cute!!! Ava will love these!
My kids absolutely love these! We did an American flag one as well as a minion one! So awesome!
These are really cute and easy to make. Going to try and make one for my niece sometime