No compensation was received for this post.
One of our few un-carved pumpkins still sits on our porch…a reminder that just a couple of weeks ago, we were putting together DIY Halloween costumes and trick or treating with the Mouse. As has become the retail tradition, Christmas began the day after Halloween, as stores displayed holiday cheer in the form of lights, decor and an abundance of toys. I have yet to formulate any type of Christmas Wish list for family and friends, so I’ve yet to even begin thinking about shopping for gifts. However, I do know that last year’s venture into personalized, DIY Holiday gifts was a success and intrinsically satisfying.
Admittedly, I tend to struggle with originating new ideas despite my love for crafting and DIY. Thanks to FedEx and Brittni Mehlhoff, founding editor of Paper & Stitch, I’m sharing her best holiday-inspired DIY decor projects and gift ideas.

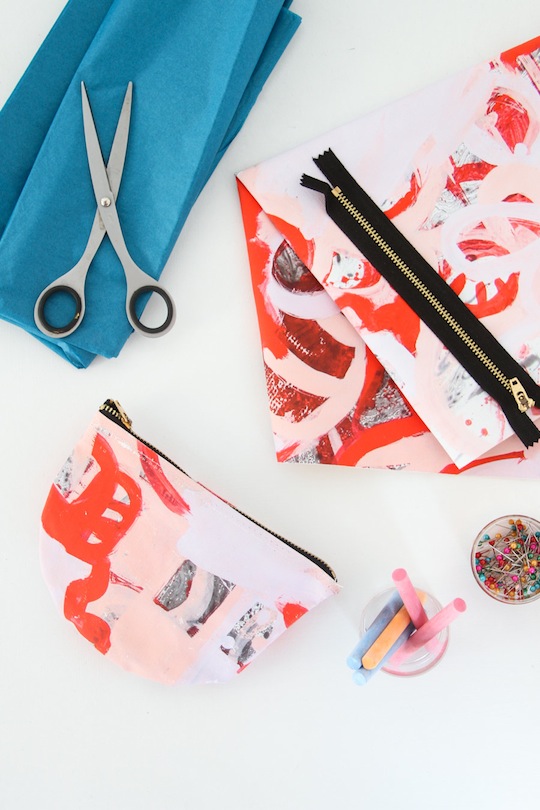
If you’re looking to gift your grandmother, mother, sister, or best friend with a gorgeous, handmade gift with chic twist, check out Brittni’s easy DIY Clutch. Once she printed out her pattern on canvas at FedEx.com, she used a sewing machine to put it together. I’ve included the directions here, however, I encourage you to view the video which provides a detailed tutorial.
DIY Half Circle Clutch
Materials:
– 16×20 printed canvas from FedEx
– Pliers
– Tissue paper
– Chalk or disappearing ink pen
– Zipper
– Scissors
– Thread
– Straight pins
– Zipper foot
– Sewing machine
Steps:
1. Print your canvas from FedEx. Then, remove the canvas from the stretcher bars with a pair of pliers (to remove the staples).
2. Next, using the tissue paper, create a template for your clutch. Make sure that the top edge of the template is the same length as the teeth of your zipper. Cut the template out.
3. Using chalk or the disappearing ink pen, trace the template onto the wrong side of the canvas. Then, draw the shape again – this time with a 1/2″ seam allowance.
4. Using this larger shape, cut out the canvas. Repeat this step one more time so that you have two identically-shaped pieces of canvas.
5. Now that you have the front and back pieces of the canvas clutch, you’ll want to sew the zipper on. Align the fabric edge of the zipper (right sides together) to the top edge of the clutch on the right side of the canvas. Pin together using straight pins. Using your zipper foot, sew them together. Back-tack at the beginning and end to prevent unraveling. Repeat this for the opposite zipper edge and the other piece of canvas.
6. Open the zipper halfway. This part is very important because if the clutch is sewn with the zipper shut, it will be very difficult to turn it right side out at the end.
7. Pin the clutch with the right sides together. Sew the clutch along the shape that you initially traced (which will give you a 1/2″ seam allowance). Back-tack at both the beginning and end to prevent unraveling.
8. Cut small vents along the edge of the clutch, especially at curves and corners. Be careful to not cut through the sewn line. Now turn the clutch right side out and it’s ready to use.

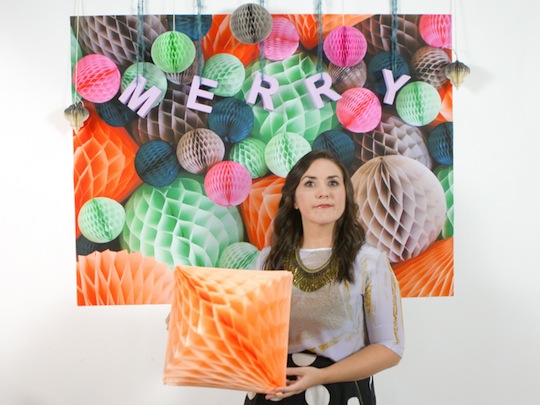
‘Tis the season for holiday parties! If you’re looking to add a little sparkle to your next gathering, why not put together this easy DIY Photo Booth Backdrop. You can print your favorite designs or patterns to use or start from scratch. In Brittni’s tutorial, she arranges paper honeycombs in a variety of shapes and colors, then photographs and prints the pattern out on canvas (36×48). Simply attach the canvas to the wall using Command Strips. If you want to add dimension or include a holiday message, simply pick up wooden letters and paint them. Then hang them against the backdrop for the perfect holiday memory from your party.
DIY Photo Booth Backdrop
Materials:
– Flowers or honeycomb paper shapes
– Camera
– Paper print from FedEx *I couldn’t find the largest available measurement for the paper prints online – if you can let me know what that is or direct me to that page on the website, I’ll add the specific dimensions that I’ll be using.
– Command strips, or washi tape
– Optional (acrylic paint and paint brush)
Steps:
1. Layout the items that you want to use for your photo booth backdrop in an interesting way, on a large surface, like the floor or a large mat board.
2. Photograph the layout, directly overhead.
3. Head to FedEx to have the image printed.
4. Hang the backdrop on the wall with Command strips, washi tape, etc and it’s ready to use for holiday parties as a photo booth backdrop.
Optional additional step: Add a holiday message directly to the print (toward the top if you want it to show up in photos) with paint and a paint brush.

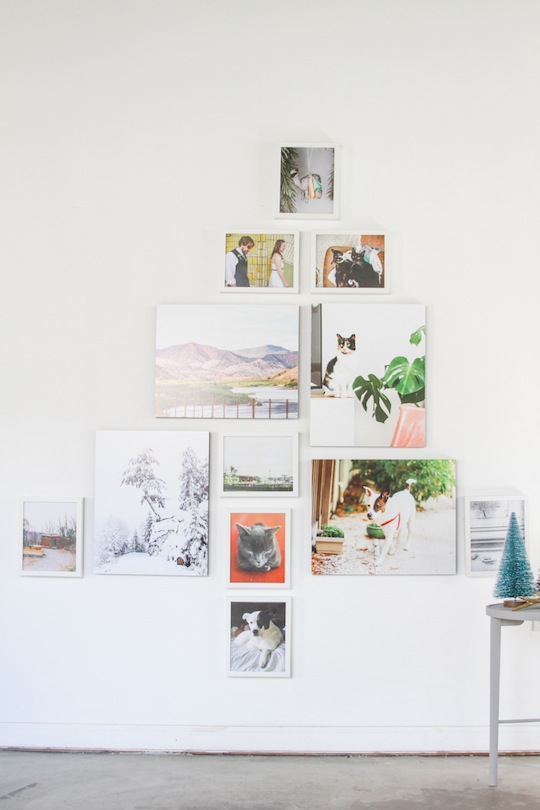
Decorating our home for the holidays is a tradition my kids are emphatic about. In fact, each year we try to incorporate at least one DIY project into our home, which adds a warm, personal sentiment. Brittni’s DIY Christmas Tree Gallery Wall is a creative way to display your favorite photos. Once you’ve selected photos that share a common theme, create a mock-up of your design on the floor and take a quick photo with your smart phone. This will help make it easy to re-create your Christmas Tree on the wall. Hang the photos with Command Strips, then add a little sparkle by hanging ornaments on the frames. Finish with your favorite “tree topper.” Once the season is over, simply re-arrange your gallery into a design that will work throughout the year.
DIY Gallery Wall for the Holidays
Materials:
– Photo posters from FedEx of family photos and/or artwork (7 10×10 photo posters + 1 16w x 20h photo poster + 3 20w x 16h)
– Command strips (or hammer and nails) for mounting to the wall
– (Optional) stand of holiday lights
Steps:
1. Print your photo posters at FedEx.
2. Mock up the Christmas tree shape on the floor first to give yourself a guide for hanging. Measure the edges into a Christmas tree shape.
3. Based on that measurement, create a washi tape triangle tree on the wall to use as a guide.
4. Hang photos and remove tape.
5. (optional) Hang strand of lights back and forth across the ‘tree’ to accentuate the shape.
Right now, you can save 50% on photo prints at FedEx.com/Photos. Be sure to visit the website for additional holiday-inspired DIY projects.
- Discover Luxury at Sonesta Irvine: Your Ideal Staycation - August 8, 2024
- CHOC Walk Returns to the Disneyland Resort – Special Events and Ways to Support - June 28, 2023
- Beastly Ball Returns to the Los Angeles Zoo - May 8, 2023

Leave a Reply